Route name: Daidoushin Nanryo (大同心南稜)
Mountain: Yatsugatake
(八ヶ岳)
Map sheet: 33 [Yama-to-kougen-chizu (山と高原地図) series]
Time: 3-4 hours
Difficulty: Grade 2+
alpine route / IV A1 crux

The Daidoushin pinnacle (大同心) is one of the most recognisable features of the Akadake-Kōsen (赤岳鉱泉) area of the Yatsugatake range. Along with its smaller
sibling, the Shodoushin pinnacle (小同心), it sits high up on the face above the
Uradoushin and Daidoushin gullies,
below the summit of Mt Yokodake (横岳 2760m).

Its
conglomerate rock is notoriously loose, so summer ascents of any of its routes
cannot be seriously recommended. In winter, however, the cold temperatures hold
things together a bit better and it can be climbed with a little more sang-froid. Winter brings its own
challenges though, and the southern and western flanks of the pinnacle are
usually exposed to bitterly cold winds. The low temperatures mandate climbing
in boots and crampons, which raises the intensity level of the climbing, and
with the pinnacle situated high up on the western aspect of Mt Yokodake above
the Uradoushin-runze and Daidoushin-runze ice routes, the exposure on those
walls is immense and thrilling.

In
pure grade terms, the easiest climbing route is the 4-pitch South ridge. You’d
better bring your A-game though, as the crux final pitch up the overhanging
prow to the top will need both free-climbing and aid-climbing skills, as well
as a cool head.
Getting
there:
If
travelling from Tokyo, take a Super Azusa Limited Express train from Shinjuku to Chino (approx. 2.5 hours). Outside the JR station at Chino take a
bus to Minotoguchi (美濃戸口, approx. 45 minutes). This is the gateway to the
Akadake-kōsen side of Yatsugatake. From the carpark start hiking up the trail
that is signposted to Akadake (赤岳). The
walk-in takes up to 3 hours by map time. It is split into 3 stages. The first
hour brings you past a series of buildings and on a little further to a hut with
a water source, which makes a good resting point for 5 minutes. The trail
splits here, with the right fork going up Minami-sawa
(南沢) to the Gyouja-goya hut (行者小屋). You need to
take the left fork up Kita-sawa (北沢).
The next hour follows the rough dirt road until it finishes at a bridge across
the sawa. From the other side the path narrows and meanders alongside the sawa
for another hour or so until you reach the hut at Akadake-kōsen. This hut and
its campground serve as basecamp for all the routes in the area.
Description:
From
the Akadake-kōsen hut go up the steps near the door and take the path straight
on towards the ice routes (Daidoushin runze, Uradoushin runze, Jougosawa) on
the left-hand side of the face below the summit of Yokodake (横岳).
Follow
the trail for about 15 minutes through the forest and you will come to a
signpost pointing right into the bottom of the Daidoushin runze (大同心ルンゼ), or
gully. Here you have a choice to make in
terms of how you wish to approach the start of the South ridge. There are three
options as follows:
(i) Head
into the Daidoushin runze and follow the stream for about 10 minutes and you
will come to a trail heading up on your left along the lower section of the
Daidoushin-ryo. This ridge is the normal descent ridge from the adjacent Uradoushin runze (裏同心ルンゼ) ice route, but can be easily ascended in about an hour to
its apex at the foot of the Daidoushin rock pinnacle. From the top, traverse
the descending ramp around the south side of the pinnacle until you reach the
bottom of the first pitch of the South ridge.
(ii)
Head into the Daiduoushin runze and continue up it until you reach the Ōtaki
icefall. Ascend this and then continue up to the top of the runze where it
swings to the left into the mixed gully behind the Daidoushin pinnacle. From
here head up and left for a few metres to the bottom of the first pitch of the
South ridge.
(iii)
Continue along the trail to the entrance to the Uradoushin-runze and ascend
this to the top of the Daidoushin-ryo. From the top, traverse the descending
ramp around the south side of the pinnacle until you reach the bottom of the
first pitch of the South ridge.

Route topo:

Once
at the bottom of the first pitch, it’s time to gear up and start the climb.
Approximate pitch descriptions are as follows:
Pitch
1: Climb the line of weakness up the rock to an in-situ anchor on a long ledge.
(35m III)
Pitch
2: Traverse to climber’s left around the arête, then climb the bulgy chimney
directly above to belay at an in-situ anchor on the arête itself just past a
pinnacle. (35m III)

Pitch
3: Continue up for a few metres, then traverse out across a ledge to a bulge at
the end. After the bulge ascend frozen turf ledges to a bolt belay at the foot
of the final rock prow up the dome. (12m II)
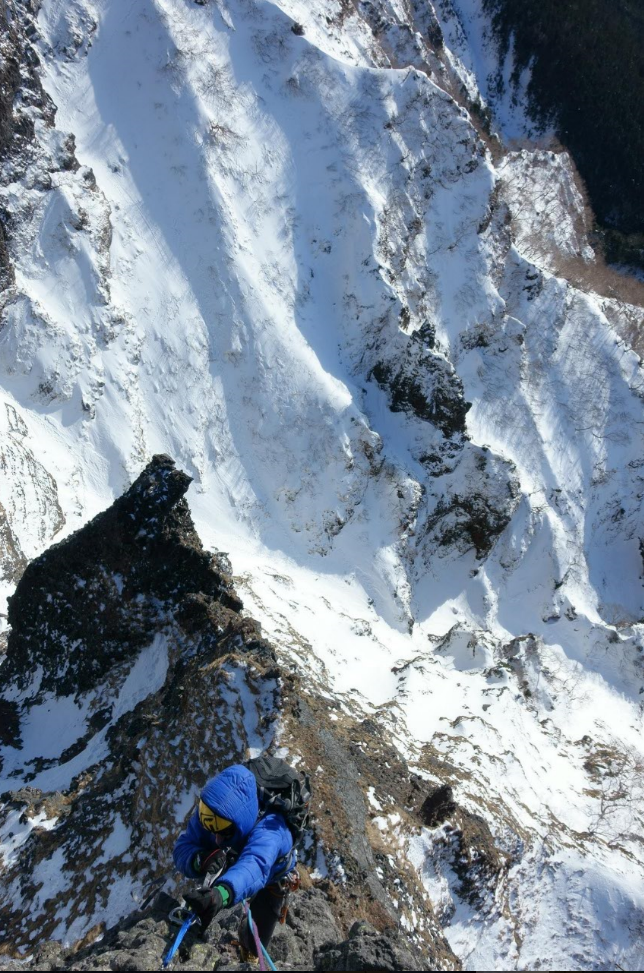
Looking down pitch 3:

Bolt anchor before the final pitch:

(Note:
If you don’t fancy the final pitch to the top, the route can be escaped from
here by descending the ramp to climber’s right to the short chimney at the top
of the mixed gully. The top of the pinnacle can be gained by climbing this
chimney and going around on the right to loop back along to the top on easy
ground.)
Looking across to the Shoudoushin pinnacle, and Mt Akadake beyond:

Pitch
4: From the belay climb steeply up on the left side of the prow for a few moves
to in-situ pro. The pitch continues up the prow through rock ranging from
vertical to overhanging, via a mix of aid-climbing on in-situ pitons and
free-climbing in the transitions between aid sections. The exposure on this
pitch is immense. Eventually you will reach an in-situ anchor at the top of the
prow. (40m IV A1)


Aid-climbing up pitch 4:
Looking down from the final anchor:

From
the top anchor, continue up easy mixed ground to the top of the pinnacle.
Descent:
From
the top of the pinnacle you have a couple of options:
1.
Descend back to the col, then climb easy mixed slopes to gain the main ridge
hiking trail, and either continue left to Mt Iodake, or right over Mt Yokodake
towards Mt Akadake.
2.
Descend the mixed gully behind the pinnacle (in-situ rappel anchors if you need
them), climb the ramp back up to the top of the Daidoushin-ryo, and descend the
ridge back to the entrance of the Daidoushin-runze and on back to the hut.
Summary:
An
interesting route through steep and insecure terrain on the most recognisable
rock feature in the area, with some wild positions culminating in an outrageous
aid pitch to the top. Whilst not for the faint-hearted, this is an excellent
and challenging way to get to the top of the Daidoushin in winter!
Are you interested in climbing classic alpine and winter routes in the Japanese high mountains?
If so, pick up a copy of the book on Amazon (available in print or Kindle e-book formats) and help Climb Japan at the same time. Thanks for your support!

Stunning climb with a great write up! Gonna be a while before I grow the balls for this amazing route.
ReplyDelete